Showing posts with label MAKEUP. Show all posts
How to: Perfect Foundation Routine for Dry Skin

How to: Perfect Foundation Routine for Dry Skin

If you have dry skin, you know how it is – foundation can glide over flakey patches and cover red, irritated skin. It can also settle into fine lines and make you look like a peeling statue. It all depends on your skin care routine and what type of products you use.
Dry skin isn’t something that you need to just live with forever. If you treat it properly, it will get better. Start a new routine now and see a transformation within the next few weeks.

#1: Prep your skin

Before you start sloshing on product, you need to prepare your skin. Use a gentle cleanser in the morning. After you wash your face, apply a moisturizer. Wait at least five minutes before you apply your foundation.
It is important to give the moisturizer some time to dry so that you aren’t just wiping it around your face. Let it sink into your skin for a few minutes before you do anything.
If you skin tends to get flakey midday, you probably have a buildup of dead skin. Try using an exfoliating scrub at least once a week. It’s important to clear away the dead layers of skin then moisturize the active skin daily.

#2: Start with primer

Source
Source via www.tumblr.com
If your skin is flakey, primer is incredible useful. It will create a strong protective barrier to help keep the moisture in and protect your skin from environmental stressors. There are a few foundations and BB creams that have primer mixed in but they won’t do the job as well.
The combo formulas can be great for everyday use but if you are dealing with a flakey patch, you will need a separate primer. There are primers specifically designed for dry skin so do a bit of searching to find the right one for you.

#3: Be careful with powder

Liquid foundation will work for dry skin much better than powder. It will glide over dry spots rather than settle into them like a powder can do. The one time that you can use a powder on dry skin is to set the foundation.
Give the liquid foundation a few minutes to dry then gently brush on a thin layer of translucent powder.
Be sure to use a good quality brush. Sponges and the small brushes that typically come with powder won’t give you even coverage.

#4: Use a foundation brush

Applying liquid foundation with your fingertips can cause more flaking so stick with a brush. Use a very gentle touch and go in a downward motion as you put it on.
If your skin is irritated and dry, the last thing that you want to do is irritate it more. When you are applying it, remember that less is definitely more when it comes to cream. If you apply too much, it will start to get cakey and settle into patches.

#5: Choose foundation wisely

Beutiful blonde with make up 8
High definition foundations can a godsend for every skin type, especially people who are dealing with dry patches. It isn’t just marketing hype. There is a real difference between your standard foundations and those that are true high definition.
By adding micro beads of silicone and mica, high definition foundations cause light to bounce off of your skin. The diffusion of light is going to cover up any kind of skin imperfection from dryness to wrinkles to redness.
Avoid oil-free foundation. Don’t worry about breakouts that can be caused by oil. You are actually more likely to breakout if your skin is overly dry. It is fine to use the oil-free formulas on days when your skin is feeling hydrated but avoid it when your skin has dry batches.
Combination skin can definitely be tricky. Rather than trying to find something that works for every bit of your face, use multiple foundations.
If you are prone to dry spots in particular areas, treat them differently. Use extra moisturizer in these places and hydrating foundation then stick with oil-free products on the rest of your face.

#6: Highlight you assets

Fake a dewy glow with highlighter. After you get a thin layer of foundation on and let it dry, add a highlighter. Dab it on over your cheekbones, the bridge of your nose, and across your forehead. Only use a tiny bit on then blend well.
Carry a small bottle of hydrating toner with you throughout the day. A quick mist will be energizing and give your skin a glowing boost.
7 Tips to Help You Rock Black Lipstick This Halloween

7 Tips to Help You Rock Black Lipstick This Halloween

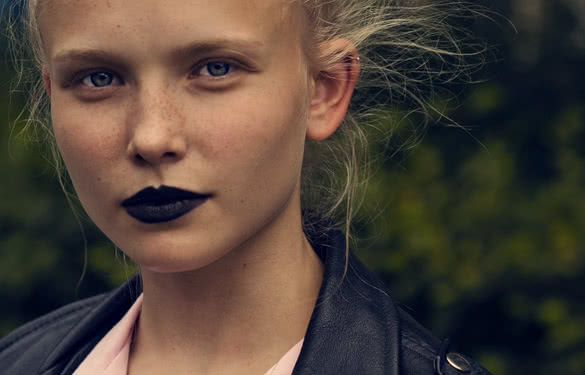
Black lipstick is evocative, enigmatic and just a little bit edgy. And, with Halloween just around the corner, black lipstick it’s making a comeback once again.
However, as those of us who went through a ‘Goth’ phase in high school can tell you, black lipstick can transition from trendy to tacky in a single fell swoop. There are few make-up faux pas worse than leaving the house with perfectly sculpted black lips only to have them smudge onto your chin while you’re waiting for the bus.
How can you keep your black lipstick looking perfect all night long? Just follow these 7 simple tips!

#1: Prep your lips

DIY Beauty
Lipstick lovers will already know that applying a dark colour to dry lips can have a disastrous effect. Colour will sink into fine lines and cling to dry patches, making for an uneven finish.
For a smoother, longer lasting finish, exfoliate your lips beforehand. You can do this by applying a coat of Vaseline to your lips and letting it sit for a minute or so. Then, with a children’s toothbrush (no regular toothbrushes, girls, they’re too rough!), brush your lips in a circular motion to remove any flakiness. Simple, right?
To finish, give your freshly exfoliated lips a light coat of moisturising lip-balm to keep them soft, hydrated and ready for the next step. 

#2: Use a lip-liner or reverse-liner

Black lipstick is notorious for feathering and bleeding. The best way to keep the colour contained is to apply a lip-liner to your lips before filling them in. Make sure to choose a liner that matches your shade of lipstick. This way, you can use it to resculpt your lip shape if necessary for a perfect, clean lip line.
If you don’t own a black lip-liner (let’s face it, how often are you gonna use it?), a black eye-liner pencil will work almost as well (we won’t tell if you won’t). Just don’t use anything too creamy, as it will smudge more easily.
If you have a reverse-liner in your make-up stash, they’re another great option for creating a barrier between your lipstick and your foundation to prevent bleeding.

#3: Grab a lip-brush

Source
Source via www.pinterest.com
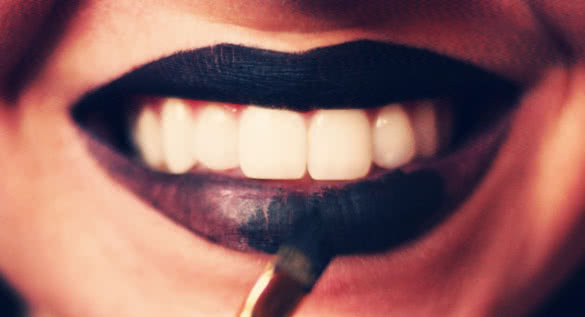
Often lipstick bullets are too thick at the tip to give you total control. This can lead to an uneven lip shape and lack of definition around your cupid’s bow.
A lip-brush, however, will give you complete control and help you stick within your lip line for an effortlessly neat finish. This step isn’t strictly necessary, but it definitely helps when applying dark lip colours. 

#4: Blot, blot and blot some more

When red or pink lipstick fades, it no big deal because it melds into your natural lip colour. When black fades, you get a weird pink/black gradient that is anything but flattering. So, it’s important to make sure your lipstick is going to stay in place all night.
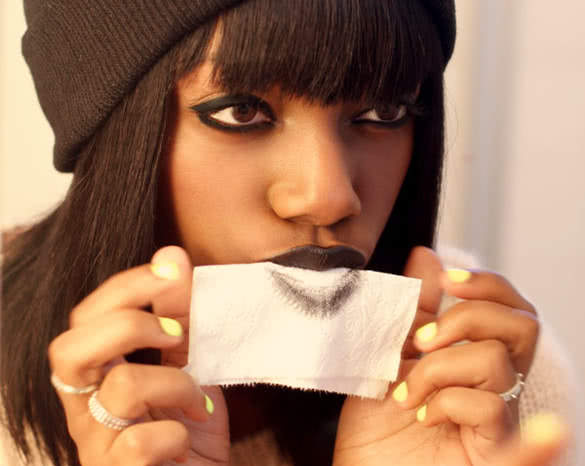
You can achieve longer lasting black lipstick by applying a light coat of concealer to your lips as a base. Then, when you’ve applied coat one of your black lipstick over the top, blot the excess product off with a tissue. Repeat this step once more, before applying a layer of translucent powder to set everything in place.
Finally, add your last coat of black lipstick for an opaque, immovable finish. Concealer, lipstick, blot, lipstick, blot, powder, lipstick. Got it?

#5: Keep your eye make-up simple

Source
Source via www.pinterest.com
Just a quick reminder: if you’re going to play up your lips, keep your eyes simple. Try a neutral wash of colour over the lid, a touch of eyeliner and plenty of your favourite mascara. You don’t want to overwhelm your face.
Of course, if you’re going to a Halloween party, feel free to throw this rule out the window. After all, no sultry vampiress would be seen dead (or alive?) without deliciously dark and seriously sexy smoky eye shadow.

#6: Be prepared to pout

No matter how well you’ve set your black lipstick, if you want it to stay perfect all night, you’ll have to be slightly aware of it. At first, this will probably involve making that awkward perpetually pouting face, but don’t worry-as the evening wears on you’ll become more comfortable with your lipstick.
Still, if you’re going to be drinking a lot, try to do so through a straw to limit the amount of contact your lips will have with the glass.

#7: Expect touch-ups

Black Woman With Black Lipstick
Sometimes, accidents happen. Like when you accidentally plant your luscious lips on that guy/gal you’ve been admiring for months.
In case of emergencies, be sure to throw your lipstick, lip-brush, a make-up remover wipe and a compact mirror in your bag for quick touch ups.
And there you have it. Whether you’re headed out for Halloween or just want to try the black lipstick trend, keep these 7 handy tips in mind to achieve sexy black lips that’ll last all night long.
5 Brilliant Blushes to Fake That Summer Glow All Winter Long

5 Brilliant Blushes to Fake That Summer Glow All Winter Long

When that familiar chill creeps into the air and department stores deck themselves out in lights, we know the holiday season is well and truly upon us. What does that mean? A perfect excuse to shop, some amazing end of year parties and the return of the Starbucks Gingerbread latte.
We love winter. Our skin? Not so much! Without regular doses of vitamin D, it can be hard to maintain a gorgeous, radiant glow and even the best cared for skin loses some of its lustre.
Don’t despair; the right blush can do wonders to breathe some life back into your complexion. Check out our list of the 5 Best Blushes to keep you looking fresh this winter.

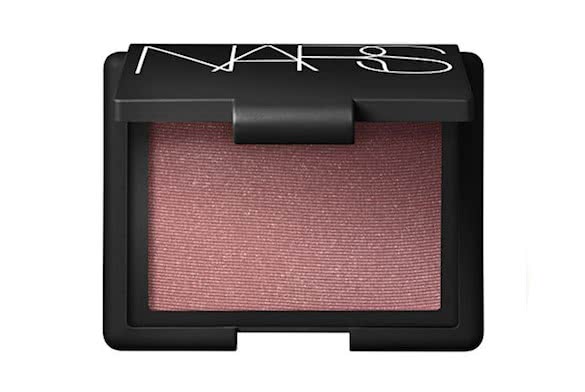
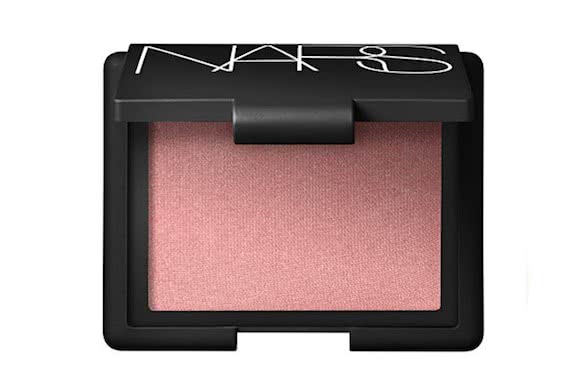
1) NARS Oasis ($29 USD)

Source
Source via www.beautydirectory.com.au
Check it out here
NARS are true pros at the blush game. Most beauty junkies swear by their ability to create, smooth, long-lasting and gorgeously pigmented blushes. NARS Oasis is no exception. Pegged as a “sparkling pink champagne” colour, this blush will glide onto your skin in a harmonious marriage of berry and golden shimmer. Did we mention that mauve is totally trending this season?
Apply Oasis with a stippling brush for a gorgeous wash of colour that will help you leave your winter woes behind. If you want a more dramatic finish, use your regular blush brush, but be warned: this baby packs a punch!
Dupe Alert: Girls on a budget who are dying to get their hands on Oasis should check out ELF’s Studio Blush in Berry Merry ($3 USD) for a similarly silky shimmery mauve colour.

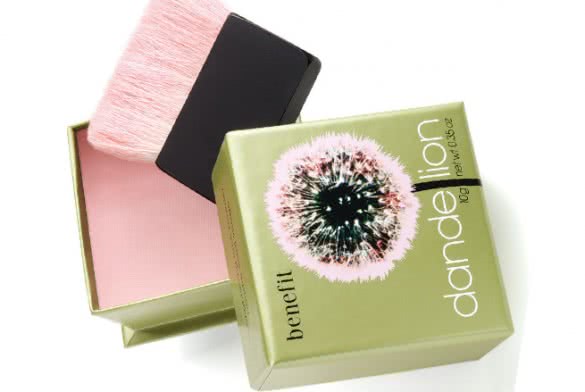
2) Benefit Dandelion Box Powder ($28USD)

Source
Source via www.beautydirectory.com.au
Check it out here
Okay, so the Benefit Dandelion Powder isn’t strictly billed as a blush… but this gorgeous peachy gold (or “sheer ballerina pink”, according to Benefit) brightening face powder is too perfect for winter not to mention. For those who want to fake a subtle, healthy summer glow without so much as setting foot in the sun, this universally flattering shade will definitely do the trick.
Keep in mind that this brightening powder is marketed at fair to medium ladies and may not show up so well on darker skin.
Dupe Alert: Not willing to shell out $28 for a blush? W7 has got you covered with their similarly packaged pink brightening face powder in Candy Floss (around $5 USD).

3) NARS Orgasm ($28 USD)

Source
Source via www.beautydirectory.com.au
Check it out here
Let’s face it – no blush list could ever be complete without the infamous Orgasm blush from NARS. This industry favourite boasts a silky texture and natural finish that will flatter most skin tones. The colour is somewhere between coral and peachy pink and contains just a hint of golden shimmer. This naughtily named blush is a must-have for a youthful, radiant complex all year round.
Dupe Alert: Looking for a cheaper alternative? Some beauty junkies insist that NYXPinched ($5 USD) is a good match. Although this coral coloured dupe is slightly pinker than Orgasm, it will do wonderfully in a pinch (get it?)!

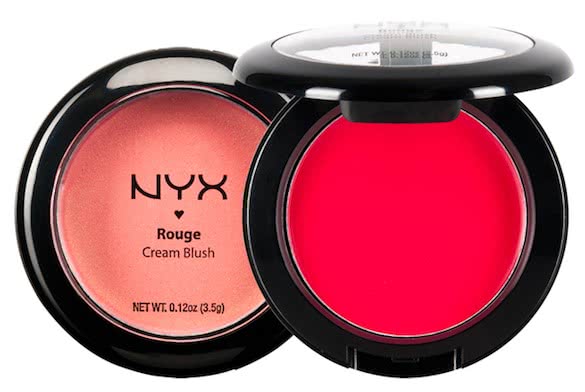
4) NYX Rouge Cream Blush in Red Cheeks ($6 USD)

Source
Source via www.beautydirectory.com.au
Check it out here
Cream blushes are a great choice for those of you who experience dry skin in winter, because they’ll minimise the amount of flaking you’re left to contend with. The NYX Rouge Cream Blush in Red Cheeks has a velvety smooth and easy to blend formula that will help you achieve an oh-so flattering natural flush in no time. Unlike most of the other blushes we’ve discussed, Red Cheeks isn’t pink. It’s actually a sheer, sultry red that will really shine on all your super pale beauties out there.
No need for a dupe here. This price is a steal!

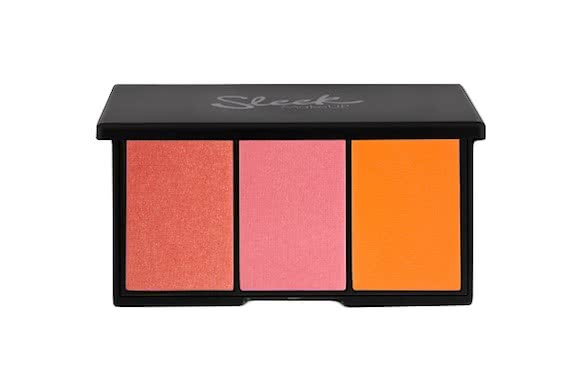
5) Sleek Blush By Three in Pumpkin ($12.49 USD)

Source
Source via sleekmakeup.com
Check it out here
A lot of the blushes we’ve discussed so far are aimed at girls with a light to medium complexion. However, if you’ve got a deeper skin tone, this one’s for you.
Sleek’s Blush by Three palette is a great value trio palette, containing the shadesPumpkin Pie (a dusky coral with gold flecks for highlighting), squash (a bright, buildable medium pink) and lantern (a gorgeous matte orange).
These hues will show up perfectly on fair and medium girls, but they look particularly lovely on dark skinned darlings. Lantern is an awesome pick for those wanting to give their sun starved complexion a glowing pick me up.
Again, no dupe here, because we’re dealing with a competitively priced trio palette.
What do most of these blushes have in common (other than a silky texture and impressive wear time)? Golden shimmer. Keep this in mind for your own blush hunt: the best blushes for winter 2013/2014 sport golden flecks to leave your skin illuminated, fresh and totally glowing all season long.
Best 5 Make-up Removers You Can Find At Home

Best 5 Make-up Removers You Can Find At Home

Makeup enhances our natural looks, but it can also be highly damaging if it is not properly removed from the face. Sleeping with your makeup on can clog pores and cause acne breakouts and premature aging, so if there’s one beauty rule that you should remember, it is to always remove makeup from your face before turning in for the night.
While synthetic makeup removers are highly popular and easy to purchase, you may want to consider natural options. Here are top four makeup removers from natural materials that you may even find in your home. These have no negative impacts on the skin, are environment friendly, of course, safe and natural!

#1 Almond Milk

Almond milk is derived from almond nuts. Unlike other types of milk, it does not contain any lactose. In order to make some almond milk, you can place some blanched almonds in the blender and mix it until it becomes frothy and creamy. Almond milk is naturally cleansing, and its enzymes will easily remove the oil, dirt and makeup accumulated over the busy day. In order to remove the makeup, place some almond milk to a cotton ball and rub it all over your face in circular motions until it becomes makeup-free. Then rinse the face clean.
Keep the extra almond milk inside the refrigerator and use up within a week.

#2 Cucumber

Happy girl in towel holding cucumber slices
Due to the moisturizing qualities of cucumber, you can be guaranteed that your face won’t feel dry and dull after you have scrubbed off all your makeup. Cucumber is also beneficial because it exfoliates your skin, completely eliminating the need for synthetic facial scrubs. You can use cucumber juice to wash your face or use your blender to mash it to a pulp before applying the paste to your face.

#3 Soy Milk and Banana

Bananas and soy milk are one of the perfect combinations to remove makeup from your face. Bananas and soy milk contain enzymes that dissolve makeup and help remove the dirt and grime that have settled on your face. In order to make the mixture, cut up a banana, mash it up and combine it with soy milk. Continue to mash the banana until there is a consistent mixture and spread it all over your face. Leave it for a few minutes and rinse off.

#4 Olive Oil

olive oil on wooden table
It’s healthy for you, both inside and out. It’s better than your typical makeup remover because it’s natural and less abrasive to the skin. You can use olive oil as is  or mix it witch hazel, which makes an incredible combination because witch hazel contains astringent properties and olive oil contains moisturizing properties. The helps you avoid clogged pores and dry skin that may be the result of using harsh makeup removers.

#5 Coconut Oil

Coconut oil is very high in saturated fat content, but it is very hydrating at the same time making it best for dry skin. It easily removes stubborn makeup especially from the eyes. Aside from effectively loosening up makeup, it has anti-fungal, anti-viral and anti-fungal properties, so you can also use it as a moisturizer and skin protector after washing makeup off from your skin.
These ingredients are things that you can find at home, so give them a try when you can. Who knows, you may never need to buy makeup remover anymore!
3 Glamorous New Year’s Eve Eye Makeup Ideas & Tips

3 Glamorous New Year’s Eve Eye Makeup Ideas & Tips

New Year’s Eve is one of the most exciting nights of the whole year. It’s the perfect opportunity to catch up with the girls, down some bubbly and discuss the highs and lows of the year that has been. It’s also a great chance to step out of your cosmetic comfort zone and rock a glamorous eye makeup look you normally wouldn’t dare to wear. Short on ideas? We’ve rounded up 3 eye catching New Year’s Eve makeup ideas to give you some divine inspiration. Keep reading to see our list and makeup tips to create each look.

#1 Sexy Smokey Eye

Source
Source via pinterest.com
Nothing says glamorous like a smokey eye. However, for many of us ladies, a black or brown smokey eye is a clubbing staple, and New Year’s Eve is all about trying something new. To reinvent the classic smokey eye for the biggest party night of the year, all you need to do is change up your colour scheme. If you frequently sport a grey or black smokey eye, opt instead for sultry purple hues. If brown is your colour of choice, mix things up by covering your lid in a gorgeous royal blue.
If you really want to glam things up, you can also try a non-monochrome smokey eye. To achieve the gorgeous multi-hued eye makeup pictured above, just follow these instructions:
Step 1: Apply an eye-primer to prevent creasing, then pack a matte black eye shadow onto your lid. Turn up the outer corner of the shape you’re creating slightly to create a cat eye.
Step 2: Select a warm, matte brown eye shadow and sweep it into your crease, blending it carefully with the matte black.
Step 3: Now, choose a similar brown eye shadow, this time with a shimmery finish. Go over the upper border of the matte brown colour, blending the two together in a seamless transition. Add a white or champagne colour along your brown bone, once again blending the colour downwards.
Step 4: Drag a frosty gold eye shadow half way along your lower lash line. If you’ve got a gold glitter eye liner or loose pigment, apply it over the top for more intense colour. Switch back to your matte black shadow to complete the outer half of the line. Connect it up with the black eye shadow on your lid.
Step 5: Line your waterline with a waterproof black eye-liner, then apply a generous coat of mascara. For a super dramatic look, you can also choose to add false lashes.
This glittering smokey eye is bound to get people talking!

#2 Glitzy Cut-crease

Source
Source via weheartit.com
It’d be a crime to talk about dramatic and edgy eye makeup without including a cut crease look. The combination of glittery silver and navy blue works perfectly to create a beautiful, eye-catching and altogether sexy look that embodies the glitz of New Year’s Eve. Follow these steps to get the look:
Step 1: Prime your eye with an eye primer, then use a dark blue eye pencil to thickly outline your crease. Flick the edge outwards to create a cat-eye effect.
Step 2: Use the same dark blue eye pencil to line your upper lash line. Connect this line to the cat-eye flick you created at the outer edge of your crease.
Step 3: Use a fluffy blending brush to smudge the eye pencil in your crease, blending it outwards in a windscreen wiper motion. With a fluffy crease brush, apply just a touch of dark blue eye shadow over the top of the smudged liner to intensify the colour. Again, blend outwards before redrawing in a final blue pencil line for definition.
Step 4: Pat a thick layer of silver eye shadow onto your lid, trying to keep it out of the crease. Add a glitter pigment if you have one to amp up the effect.
Step 5:  Re-darken your cut crease anywhere glitter or silver eye shadow fall out has touched it. You want a bold, intense line. If you wish, go over the eyeliner on your upper lash line with a liquid liner for a cleaner look.
Step 6: Use the same dark blue eye liner as before to line your waterline and lower lash line, connecting the latter to your cat-eye.
Step 7: Highlight your brow bone with a white or champagne eye shadow and blend away.
Step 8: Add mascara and false lashes if needed.
This look isn’t for the faint of heart (or shaky of hand), so we suggest you practice the cut crease technique before the big night. But trust us, it’s worth it. This stunning look always turns heads.

#3 Coloured Eyeliner

Source
Source via pinterest.com
Ladies who prefer to go with a more natural look can spice up their eye makeup on New Year’s Eve by swapping their usual black or brown eyeliner for coloured eyeliner. It’ll give your eyes a surprising pop of colour that’s oh-so sexy without being too overtly dramatic.
Step 1: Prime your eyelids with an eye shadow primer, then sweep a natural champagne colour over your lids with your ring finger to even out any pigmentation issues.
Step 2: Select a coloured liquid eyeliner (aqua is bang on trend and brings out most eye colours beautifully). Resting your little finger on your cheek for balance, start in the middle of your eye, and draw your eyeliner outwards in little connecting flicks for maximum control. Draw in the other half of the line until you’ve got one smooth line that wings outward in a slight cat eye.
Step 3: Apply black pencil liner to your waterline to add a little more drama to your look. Or, alternatively, open up your eyes by running a white liner along your waterline and over your inner corner.
Step 4: Finish with a generous coat of mascara.
If you’re a novice with liquid liner, you can also use pencil, however this will create a less precise line.
We hope these 3 gorgeous makeup ideas for New Year’s Eve have given you the inspiration you need to start planning an amazing look for your special night. Good luck and may all your dreams for 2014 come true!
We wanna know: What are your New Year’s Eve plans?
How to Do Smokey Eye Makeup for Pale Skin

How to Do Smokey Eye Makeup for Pale Skin

A sultry smokey eye never goes out of style. It’s a timeless classic that’s perfect for dates, dancing and all those special occasions when you just want to ‘wow’ your company.
Although creating an iconic smokey eye isn’t all that tricky once you’ve mastered the basics, us perfectly pale girls can have a few more problems pulling off the look than our beautifully bronzed friends.
If you’ve ever attempted a beautiful smokey eye only to end up looking like you’ve just done five rounds with Mike Tyson, this post is for you. We’re going to share some of our best tips on how to do smokey eyes for fair skin.
Let’s get started!

#1 Choose the right colours

Source
Source via www.frmheadtotoe.com
Often, girls will come to us exasperated, because they’ve faithfully followed a Youtube smokey eye tutorial from beginning to end only to see a raccoon staring back at them in the mirror.
Sound familiar? Don’t panic – you’re not a lost cause. The fact is, just because your fave Youtube guru can rock an intense, black smokey eye, that doesn’t mean the same style will suit you. In order to create the sexiest and more wearable smokey eye for you, you have to choose the right colour scheme.
If you’re as pale as Kate Winslet or Gwyneth Paltrow, super dark colours are going to wash you out and look unflattering. Instead of selecting a black base colour, create your smokey eye with medium browns for a softer, earthier look that’ll appear less harsh against your skin. Medium/fair girls like Elizabeth Olsen should try a rose-based bronze colour palette for a warm glow.
Your eye colour also impacts on how to do smokey eyes effectively. For example, a gorgeous smokey eye for blue eyes can be best achieved by using colours that will really bring out those baby blues. Golds, bronze and copper colours are ideal. Meanwhile, brown eyes love lavender and teal. Are you a green eyed goddess? Try taupe.

#2 Use the right brushes

Source
Source via genericwhore.blogspot.com
A smokey eye is one of those looks that really does require a few decent brushes. You can probably get away with using your finger to apply a wash of colour to your lid and your brow bone; however, there are three main brushes you definitely need to create an effortlessly easy smokey eye:
  • Crease Brush – An angled crease brush is a must have. It lets you easily pack or shade colour into the crease of your lid.
  • Blending Brush – A fluffy blending brush is used to draw colour up from your crease in a smokey eye to create a gradient. Moving it back and forth in a windscreen wiper motion will help to blend out any harsh lines.
  • Small Angled Brush – This brush will help you redefine and intensify the outer corner of your smokey eye. It’s also great for applying eyeliner along your waterline and upper lash line.

#3 Blend, blend, blend

Source
Source via indianvanitycase.com
If there’s one point that most MUAs agree on when it comes to how to do smokey eyes, it’s that very pale ladies often require more blending and an additional transition colour to create the smokey effect without harsh lines and edges.
For example, for a traditional black smokey eye, some beauty junkies might just use one shade of black in their crease and blend it up and out into their brow bone highlight colour. However, if you’re super pale, we suggest that you make this transition a little more subtle. Instead of transitioning straight from black to white/nude, add a medium grey between those two colours for a smoother gradient.

#4 Put it all together

Now we’re going to show you how to do smokey eyes step by step.  The following instructions will help you to create a gold and brown smokey eye that will flatter most skin tones beautifully. Of course, there are many ways of achieving this timeless look, so if you prefer to use a different method, go straight ahead!
Step 1: Prime your eyes with an eye shadow primer to intensify your eye shadow colours and prevent creasing.
Step 2: Sweep a white or champagne coloured eye shadow over your brow bone as a highlight.
Step 3: Apply a gold eye shadow all over your lid.
Step 4: Using your angled crease brush, work a dark brown colour into your crease. Concentrate the colour on the outer ‘v’ and the end of your upper lash line.
Step 5: With a small angled brush, connect the dark brown colour to your lower lash line, using it to line beneath your eyes. Then line your waterline with a black or dark brown eyeliner (black will be more dramatic, but also harsher).
Step 6: With your blending brush, blend out your gold eye shadow into the dark brown colour. Then, using a windscreen wiper motion, thoroughly blend the dark brown upwards and outwards in a fan shape.
Step 7: Apply just a hint of a medium to light brown to your blending brush, then repeat this motion until this colour acts as a gentle transition between your dark brown crease colour and your white/champagne brown bone highlight.
Step 8: Line your upper lash line with black eyeliner, winging it out slightly past the end of your eye if you so desire.
Step 9: Paint your lashes with a generous coat of mascara and, if desired, highlight the inner corner of your eye with white or silver eye shadow to open it up.
With these simple tips, we hope you’re confident and inspired enough to give smokey eyes a second try. If you do attempt this look, be sure to leave us a link in the comments so we can check it out!
The 3 Best Makeup Ideas for Blue Eyes and Dark Hair

The 3 Best Makeup Ideas for Blue Eyes and Dark Hair

Are you a blue eyed babe with bold black or beautiful brunette hair? Then this article is for you! Today, I’m going to show you three gorgeous eye makeup ideas for making blue eyes pop against the backdrop of your dark, luxurious locks.
They say blondes have more fun, but from the moment I ditched my naturally blonde hair for black, people started remarking, “you’ve got the bluest eyes I’ve ever seen.” Did my eyes get bluer? Of course not! However, the stark contrast of dark hair blue eyes instantly intensifies your baby blues for a more dramatic appearance. Adding the right eye makeup to this already enchanting combo can take your look to the next level!
Not sure how to select the best makeup for blue eyes? The secret lies in the colour wheel.
Source:
Source: via pinterest.com

The Basics

Colour theory explains that the hue opposite your eye colour on the colour wheel will best compliment your eyes. This is known as a complementary colour scheme. That’s why so many eye makeup ideas for blue eyes revolve around warm, gold shades of eye shadow. This technique works well, but who really wants to limit themselves to just three or four shades of orange? Not me. Fortunately, there are other ways you can draw divine inspiration from the colour wheel:
Triadic: This colour combination describes the use of three colours that are spaced evenly around the colour wheel. For example, yellow, blue-green and violet.
Analogous: This term describes sets of colours that sit adjacent to each other on the colour wheel. The primary or second colour is generally the dominant colour, with the two colours on either side being tertiary.
Now that we’ve covered a little theory, it’s time to get into the good stuff, like how you can use this info to create the best makeup for blue eyes.

Look 1: Complementary – Copper (with a hint of gold)

Although complementary colour schemes aren’t the most original, they are a fool-proof way to create a look that will perfectly highlight your beautiful blue eyes. If you’re not super confident with makeup application yet, I recommend you start here, as complementary colour combos are more forgiving than their bolder counterparts.
Source:
Source: via pinterest.com
In this gorgeous example of complementary colours in use, the copper in the crease serves to enhance the blue of the wearer’s eye. To recreate this look, just follow the steps below:
  • Prime your eyes to intensify the colour pay off and keep your eye shadow from creasing. Then, apply a subtle golden beige colour (like Tarina Tarintino Jasper) all over your lid.
  • Next, apply a shimmery copper eye shadow (think Urban Decay’s Chopper) to the outer v of your eye, bringing the colour upwards and outwards (like an extension of your lower lash line) until it creates a dramatic wing. Sweep the colour gradually inwards, letting it fade out smoothly just before it reaches your inner corner.
  • Taking a matte white (Mac Pick Me Up) or champagne colour, highlight your brow bone. Then, switch to a fluffy blending brush to buff out any harsh edges and smooth the transition between your copper crease colour and highlight.
  • Using your favourite liquid or gel eyeliner, line your upper lid as close to the lash line as possible.
  • Line your waterline with a black or brown eyeliner pencil. Then, smudge the colour along your lower lash line with a q-tip until it meets the bottom of your outer v. If you’re craving more dramatic definition, intensify the colour by layering a dark brown eye shadow over the top.
  •  Finish by applying a generous coat of volumising mascara to your top and bottom lashes.
Let’s face it, there’s a reason it’s a go-to look for so many girls with dark hair and blue eyes. It’s warm and work-friendly with just a touch of sensuality.

Look 2: Triadic – Yellow, blue-green, blue-violet

When you’re ready to get a little more adventurous, it’s time to tackle one of my favourite eye makeup ideas. Just take a look at this gorgeous triadic combo of yellow, blue-green and blue-violet.
Source:
Source: via pinterest.vom
If you’re usually a neutrals kinda girl, this eye-catching colour combo is a great way to slip into something a touch fancier for a fun night out.
  • As usual, prime your eyelids with an eye primer of your choice. This will deepen the colours you place over the top and keep your eye shadow from fading during the day. Then, highlight the inner corner of your eyes with a white or very pale pearlised yellow (like Tarina Tarintino Wonderful #1).
  • Taking a flat, stiff eye shadow brush, pat an antique gold colour (think Urban Decay Maui Wowie) onto the inner third of your eye.
  • Using the same brush, pick up a glittery lavender colour (such as Maybelline Potent Purple) and apply it to the center of your lid, working your way to the outer third of your eye.
  • Switching to a small, angled brush and starting at your outer corner, take the same purple colour two thirds of the way along your lower lash line. Fill in the rest of your lower lash line with the antique gold colour.
  • With a dark, teal eye shadow (like Sephora Midnight Swim) on your crease brush, work this colour into your crease, starting from your outer v. Don’t be afraid to overlap with the edge of your purple colour, as this will create a beautiful gradient.
  • Switching to a fluffy blending brush, sweep the teal colour back and forth in your crease, gradually drawing it up towards the brow bone.
  • Now, highlight your brow bone with a warm beige (Too Faced White Chocolate) or matte white eye shadow. Blend the colour down into your teal crease colour, making the transition between the two colours as natural as possible.
  • Line your waterline with a black eyeliner pencil, then apply a coat of volumising mascara to your upper and lower lashes.
This totally glam combination is flirty and playful with a subtle hint of mystery.

Look 3:  Analogous – Blue, green, blue-green

Raise your hand if you’ve ever been told that you shouldn’t pair blue eye shadow with blue eyes. This amazing, sea-inspired analogous look definitely proves that theory wrong.
Source:
Source: via pinterest.com
The real key to enhancing your blue or blue-green eyes is to select a shade of blue that’s less vibrant than your eyes themselves. This will keep your makeup from washing out your eye colour.
  • Prime your eyes with your fave eye primer to keep your eye shadow from creasing and fading throughout the day. Next, apply a shimmery turquoise colour (likeMilani Teal the Truth) to the inner third of your eye.
  • Next, pick up a vibrant grass green colour (try Urban Decay Graffiti) on a flat, stiff brush and pack it onto the center of your lid, carefully blending it with your turquoise colour.
  • Select a frosty midnight blue (think Makeup Geek Ocean Breeze) and apply it liberally to your outer v, connecting it up with the grass green eye shadow. Switching to a small, angled brush, drag the colour downwards from your outer corner, taking it two thirds of the way along your lower lash line (the inner corner should remain turquoise).
  • Using a crease brush, work a dark olive green (like theBalm #42) into your crease, starting at the outer v, so that the density of the colour gradually tapers off towards the inner corner of your eye (a dark colour in the inner corner will make your eyes look smaller).
  • With a fluffy blending brush, apply a matte white colour to your brow bone in a windscreen wiper motion. Work the colour downwards until it blends seamlessly with your crease colour.
  • Keep your upper eyeliner subtle so it doesn’t eclipse those lovely colours. You can achieve this by tightlining your eyes with a black eyeliner pencil. Then, using a waterproof dark blue or black eyeliner pencil, line your waterline.
  • Apply a coat or two of waterproof mascara to your top and bottom lashes to finish the look.
This absolutely stunning sea blue eye makeup will definitely turn heads, especially on a brunette.
The three colour principles we’ve discussed today can be applied to any set of colours, so don’t be afraid to experiment and mix-and-match. However, for the tried and true best makeup for blue eyes, you can’t go past the stunning colour combinations pictured above.
Give a complementary, triadic or analogous colour scheme a go this weekend. You’ll be amazed at how many people get lost in your breath-takingly blue eyes!
Do you follow the ‘rules’ when it comes to picking eye shadow colours for your eye colour? 
3 Romantic Valentine’s Day Looks to Set Your Heart Alight

3 Romantic Valentine’s Day Looks to Set Your Heart Alight

With February 14th just around the corner, it’s time to start planning an extra special look to rock this Valentine’s Day. Whether you’re meeting up with a potential beau, your long-term sweetheart or just hitting the town with your gal pals, we’ve put together a list of 3 super romantic looks to get you in the mood for love.

#1 Sultry but Sweet in Soft Pink

softpinkmakeup
When we think of Valentine’s Day, a delicate pink palette immediately springs to mind. For a subtle pink look that effortlessly flatters every eye colour, try this sweet, soft pink eye shadow combo. The beautiful plum colour on the outer v adds a hint of sultriness to this otherwise girly look.
Step 1: Start by priming your eyes with an eye primer to keep your shadows from creasing. Then, apply a soft, shimmery pink colour (think theBalm’s Stubborn) to the inner third of your lid.
Step 2: Select any champagne coloured eye shadow and dab it onto the center of your lid, blending it with the pink colour.
Step 3: Fill in the outer third of your eye with a cherry, brown-plum hue (try Too FacedCherry Cordial). Blend it until it transitions smoothly into the champagne lid highlight colour.
Step 4: Using a crease brush, work a plum-esque taupe colour (something a touch lighter than Cherry Cordial, like Urban Decay’s Nooner) into your crease. Start at the outer v, so that the density of the colour decreases as you work your way inward. Sweep whatever’s left on the brush under your lower lash line, connecting the line to your outer v.
Step 5: Pick back up your shimmery, champagne coloured eye shadow on a fluffy blending brush. Sweep it back and forth just above your crease until the two colours are seamlessly blended. Add a hint of this colour to your inner corner to brighter up your eyes.
Step 6: Now, highlight your brow bone using a white or very light nude colour. Blend this with your champagne colour above the crease.
Step 7: Using a black (or brown for a softer look) eyeliner pencil, tightline your upper lid and line your waterline.
Step 8: Apply a generous coat of mascara and false lashes if you so desire.
Complete this look with a gorgeous, pearlised cherry brown coloured lip product.

#2 Foxy in Flamingo Pink

prettyinpinkmakeup
If you took one look at our first suggestion and thought ‘booooring’, Foxy in Flamingo Pink is probably right up your alley. This fierce pink look is perfect for gals who are a little more confident with makeup application and aren’t afraid of standing out for all the right reasons. Get this bold Valentine’s Day look by following these simple steps:
Step 1: Prime your eyes with your favourite eye primer to keep your eye shadow from fading and creasing throughout the day. Then, pick up a flamingo pink eye shadow (Like Kat Von D’s Placebo) and pat it all over your lid. Optional: Make the center of your lid shimmer by dabbing it with a shimmery, pastel pink highlight.
Step 2: Apply a matte, dark brown colour ( think Too Faced Triple Fudge) to your outer v. Drag the colour gradually inwards, sweeping it across your crease until it fades out. This should give definition to your lid without overpowering the pink eye shadow. Apply a thin line of this colour just beneath your lower lash line, linking it up with the outer v.
Step 3: Using a matte white or light champagne eye shadow, highlight your brow bone. Switching to a fluffy blending brush, use the same shade to buff out any harsh edges left by the dark brown outer v and crease colour.
Step 4: With your favourite liquid eyeliner or eyeliner pen in black, line your upper lid. Extend the line outwards into a wing or cat eye shape. If you have trouble with this step, you can use a piece of sticky tape to help you create the perfect sharp angle.
Step 5: Switch to an eyeliner pencil and line your waterline. Then, get out a glittery, pink liquid liner ( NYX Liquid Crystal Liner in Crystal Pink is a good, budget) and use it to highlight your tear duct and the inner corner of your eye for a hint of bling.
Step 6: Apply mascara to your top and bottom lashes. Using a zig-zagging motion will keep your lashes from clumping together. If so desired, you can also apply false lashes.
Finish this beautiful flamingo pink look with a touch of shimmery pink gloss.

#3 Playful in Purple

purplemakeup
For a bold and playful Valentine’s Day look that’s perfect for dates after dark, try out this breathtaking purple and plum combo.
Step 1: Prime your lids to ensure you’ll get maximum wear and colour pay off from your eyeshadows. Then, apply a shimmery boysenberry colour (like Urban Decay’sJunkshow) to the inner two thirds of your lid.
Step 2: Apply an intense, dark plum colour (try Fig.1 by MAC) to your outer v and along your lower lashline (skip the inner corner and highlight that with your boysenberry shade).
Step 3: Take the same dark plum colour and work it into your crease. Then, switching to a fluffy blending brush, blend the colour outward to create a winged shape from your outer corner.  Keep blending until you’ve achieved soft edges. If necessary, redarken the outer v to intensify the colour.
Step 4: Highlight your brow bone with a matte white eye shadow and open up your eyes by dabbing just a hint of the same colour onto your inner corner, near your tear ducts.
Step 5: Tightline your eyes and go over your waterline with a black eyeliner pencil.
Step 6: Apply a volumising black mascara and fake lashes if desired.
Complete this sexy look by painting your pout in a shimmery, berry coloured lip gloss.
Armed with your most gorgeous smile and one of these three simple, romantic looks, you’re sure to win some hearts this Valentine’s Day. Good luck!
6 Makeup Sins You Don’t Realise You’re Committing

6 Makeup Sins You Don’t Realise You’re Committing

Whether you’re a beauty newbie or a makeup maven, we all make mistakes from time to time. Fortunately, most of these makeup faux pas are easily avoided once we learn to identify them. So, let’s atone for our past makeup sins and start 2014 with a clean slate by following these six simple makeup commandments.

#1 Thou shalt not share makeup with friends

girls makeup
Go ahead and share your fears, tears and favourite dresses with your gal pals, but next time your bestie asks to borrow your lip gloss or slap on some of your mascara, think twice before saying yes. When you share makeup, you’re essentially trading germs and bacteria. This is particularly problematic when dealing with sensitive areas such as the eyes and lips. Dermatologists warn that this seemingly harmless practice can lead to a number of nasty infections and skin complaints, including cold sores, dermatitis and even the herpes virus. Yikes!
If you absolutely must share makeup, you can minimise your risks by investing in a few disposable mascara wands and some anti-bacterial spray to keep your products germ free.

#2 Thou shalt sport wear lipliner that’s darker than the lipstick

Source
Source via rahmansouri.blogspot.com
Lipliner is vital to keep your lipstick from smudging and feathering throughout the day. However, the dreadful, dated combo of dark lipliner and light lipstick needs to be catapulted back to the eighties and early nineties where it belongs (unless, of course, you’re part of a drag act). Choose a lipliner that is no more than one shade darker or one shade lighter than your lipstick colour.
If you’re a girl with a lot of lipsticks in your stash, you can save yourself the trouble of trying to buy liners for all your lip colours by picking up an invisible lip liner.

#3 Thou shalt not sleep with the makeup on

woman sleeping
Most of us know that this is a total no-no, but it can be so tempting to just fall into bed after a long night out. While occasionally skipping your cleansing routine won’t do any serious damage, regular offenders are putting their skin at risk of blocked pores, hyperpigmentation, cellular damage and even premature aging! Additionally, leaving all your makeup on overnight makes it difficult for your skin to get the oxygen it needs to repair itself while you sleep. This can cause dull, dry and damaged looking skin.
For those nights when you don’t have the energy to go through your regular skin care routine, use a makeup remover/cleansing wipe to remove your foundation and let your skin breathe.

#4 Thou shalt not overpluck your eyebrows

Source
Source via www.joseibi.com
The thinner your eyebrows, the older you’ll appear. That might sound great at fourteen or fifteen, but overplucking your eyebrows can eventually discourage the hairs from growing back and leave you looking old (or perpetually surprised!) before your time.
To avoid overplucking your eyebrows, get them shaped professionally in a salon at least once. This will give you a clear guide to follow when you take to grooming your own brows. You can also use brow stencils to help maintain a favourable shape. Keep in mind, though, thick eyebrows are back in vogue.

#5 Thou shalt not sport spidery lashes

Source
Source via weheartit.com
We all want the gorgeous big, black lashes we see in the mascara commercials. In our quest to achieve this impossible look, we can sometimes go overboard and apply so much product that our lashes become clumpy, spidery and stuck together. Not a good look.
To avoid looking like Twiggy on a bad day, remove any excess mascara from your mascara wand (just wipe it on a tissue) before using it on your lashes. And when you’re applying your mascara, be sure to start at the base of your lashes then zig-zag your way to the tips. This will help to separate your lashes as you go, preventing clumping.

#6 Thou shalt not reapply makeup in public

Source
Source via www.beautylish.com
There’s nothing wrong with powdering your nose or giving your lipstick a quick touch up on the run. However, most people surveyed (men and women) agree that performing your whole makeup routine at work or on the subway is just a little bit tacky. It’s difficult to say why this particular tradition is considered so distasteful, but, like getting dressed in the morning, some things are just meant to be done in private.
Now that we’re all a little more aware of these six major makeup sins, we can work on avoiding them and focus on putting our best faces forward in 2014. Good luck!
We want to hear your opinion: Is it bad etiquette to apply a whole face of makeup on public transport?